Tuesday, March 13, 2012

More Madness....

Socks, socks & more socks! EVERYwhere I look lately it's socks. Unpaired socks in my laundry basket, lovely print socks at the grocery store... yes! At the grocery store, and even socks in my head. I dreamed about socks last night. Turning the heel specifically.... the heel got away from me and my dpn's turned into more than one octopus... sigh... Madness. Total madness.
Yep. I think I'm stressing about socks way too much. Not sure why though... intimidating? A little. Fairly simple process? Very much so!! Really!! I think I have been putting a little too much thought into these itty bitty baby socks I'm making. So much that yesterday I put it aside and ignored it on purpose for most of the afternoon. Frustrated much? Um yeah... but.... once I sat down and focused... oh my!!  It's not that hard... really!
I just needed to see how a sock went together from top to bottom!!
Look at the picture of my baby sock (yes.. it's cute!) I started at the top - CUFF. I used a k3,p1 rib and continued it into my leg part. No direction changes yet...
Heel- start with making a heel flap which is knit separately from the instep (2 of the needles remain on the front part and just are parked). Once the flap is done, has to change direction and made into a heel. That little cup like part that holds the heel! Simple decreases is all it takes to make this direction change.
Now on to the gusset. Yep! Another direction change. Pick up the stitches along the edges of the heel flap and bring it all in together to start making a foot. Oops- too many stitches here so direction change (a bit!) again. Decreases once again! Simple!! Once that's done all I have to do is knit in a tube again (just like the cuff & leg) and head out on to the toes!!
Heel flap
 
Heel- getting ready to start the gusset

So now it's all straight shootin' - err knitting in the round! I have to continue for 2 inches then it's toe time!!
I've turned the sock so you can see that the bottom (sorry it's blurry) is now going to be knit into a tube heading down to the toes. Because we made those direction changes! Knit the cuff/leg in one direction, change it up to make a heel flap and a heel, change it again to begin another tube to put the foot in!
Pretty cool huh?!
I'll be ready for the toe later today but the weather is supposed to be nicer than yesterday...... not sure I'm going to be inside long enough to knit much!!


Monday, March 12, 2012

The Madness Continues...

Now I know another reason why I don't knit socks.
Baby socks, big kid socks, socks for me... well.. that one is a given, I don't wear them!!
BUT the main reason is socks are confusing!
Knitting is a process. I love the process. LOVE IT! I should be knocking this one outta the park... BUT why am I hitting the wall? Why am I doing this? Oh yeah... Jax's tootsies are cute. Sigh. Grand kid toesies....
Why are socks so confusing? Why are the patterns so confusing? No matter where we start (top or toes) they all have the same parts... toes, instep, heel and cuff. So how do I change direction when I'm knitting in the round for the cuff.......... oh wait! That's the problem!! I have to change direction!
Changing direction! Knitting this way, then that way, and around and around!! More than just straight knitting! Yay. That's why they are so darned confusing! Oh yeah... don't forget the kitchener stitch.......... eeegads. But that's what is going to make them fun to make!!
You knit a tube for the cuff, turn the direction and make a heel flap (Eye of Partridge Heel is cool!) and then you gotta turn it all again to make a little heel cup thing. AND then you have to turn it again to make the tube for the rest of the foot.  AND just think..... two feet. 2. Yep. I have 2 feet. That means two socks. Sigh.
LOOK HERE for the link to yesterday's post and exactly what I am up to!

I knitted the little cuff... all 2 inches of it! I used a K3, P1 ribbing so it was a little bit stretchier! I also used 5 needles (size 1's... toothpicks) instead of my usual 4.
To make the heel flap, all you do is divide your total of stitches up (my pattern told me exactly what to do!) and instead of knitting in the round... you work only on the heel! The rest of the stitches, which will become the instep, just get parked on their needles until later!                                                                                             
*always slip the first stitch of every row when doing a heel flap!! Makes it lots easier to pick up stitches later!!
MAKE HEEL FLAP:  Row 1(RS) Sl 1 st purl wise wyib *k1, sl 1, rep from* to last st. K1
Row 2: (WS) Sl first st, purl wise wyif, purl across.
Repeat Rows 1 and 2;  4,(5,6,7,8,9) times [5,(6,7,8,9,10)]sts at each edge of heel flap.
**wyib - with yarn in back **wyif - with yarn in front
My pattern uses the Eye of Partridge Heel directions, but if you want to do this in any sock...all you have to do on your heel flap is;  Sl first stitch, then k1, Sl 1 across on all RS rows. Return row, sl 1, purl across! This makes the heel a little more sturdy and will extend it's wear. It works great on grownup socks because it has a little more stretch and give and will sort of mold itself to your heel!
NOW it's time to "Turn the Heel"     ooooooh.... a direction change! A challenge!
All it requires is a series of decreases that make the heel flap turn into a little cup like thing - see it at the end of my fingers there? It turns the direction of the knitting from straight up and down, back toward the instep and heading toward the toe! You could of course totally make tube socks... but you get no style points for tube socks!
TURN HEEL
Row1 (RS) sl 1 purl wise wyib, knit 9(11,13,13,14)sts SSK, k1; turn
Row 2 (WS) sl1, purl 5 (all sizes), p2 tog, p1; turn
Row 3 (RS) sl 1, k to within 1 st of gap, ssk (sts on either side of the gap), k1, turn
*the gap is made on the previous row where you k2 tog*
Row 4: sl 1, p to within 1 st of gap, p2tog (st on each side of gap), p1, turn
Repeat Rows 3 and 4 until all heel sts have been worked.
Omitt the final k1, and p2 sts in last rep rows if necessary [10,(12,14,14,16,16)] sts.
Divide heel sts evenly onto 2 dpns. The beginning of round is now between the 2 heel needles.

That should keep you busy for today!!
This part was/is pretty easy... it gets a little trickier when we do the gusset pick up and instep... so I'm taking a break & going outside to play!!
See you tomorrow!!


Sunday, March 11, 2012

March Project - March Madness?

I love sock yarn - who wouldn't? I'm just not crazy about knitting socks. Seems like crazy madness to me!  I do like the process of knitting and socks are made using a process. How could you not like that?  Um... probably just the pair thing (pairs usually means more than one) and the fact that I don't usually wear socks. Why would I want to knit some? I can buy them right?
Well... what happens when a new friend (gee thanks TW) wants your help to make some pedicure socks? You help of course! AND unfortunately you begin to obsess about the process. The sock making process.  Yes! I know you would do the same! Obsess? LOL maybe not... but you would definitely pick up your sticks and get to knitting!
So that's just what I did! I started knitting the pedicure socks (click for link)  out of some lovely stretchy green (bright) green) yarn! Do I think I'm going to make two? Dunno yet. I know I'm going to make this one so that way I can help TW out along the way, but two?
Let's re-think this process.......
What do I need to make a pair of socks?
#1  A pattern. Easy. There are a ton of free patterns out there on the web! The pedicure socks pattern is free!
What about this one?  Spud & Chloe is so cute. Stinkin' cute!
It wasn't free (okay.. I splurged... go figure!) but I got it anyway.

#2  yarn. Yep. Got yarn. Got lots of yarn!! AND I even have sock yarn. I'm using this one... I had it.. shh that's my story & I'm sticking to it! It's Crystal Palace, Panda Cotton! (bamboo&cotton)

#3 Start the Project! Sometimes this is the worst part...
This is what I'm doing and if you want to start with me..........
Pattern:  Spud & Chloe Lot's O socks!
Take a minute and highlight or circle the sizes for what you are going to make!  I bought mine at Fibre Space in Alexandria.
Needles: Size 1 dpn's (Fibre Space, Yarn Cloud, Nature's Yarns, Inc. & even Joann might carry them. )
Yarn - Spud & Chloe fine (I'm using a yarn that uses a similar yarn -just check the gauge ) Panda Cotton by Crystal Palace 
Other Stuff:*How to keep a stitch marker on your dpn's? I put it on after the first stitch -between it and the 2nd. You could use a locking stitch marker, just hook it in the leg of the stitch and just move it up every few rows. Most of the time I just use my cast on tail...
Pattern Specifics:
Baby Sizes 0-3mos(3-9mos, 12mos, 24mos, kid sizes 2T,3T)
Cast on 32,(40,44,48,52,52)sts. Divide onto 4 needles. Place marker and join in round. Be careful not to twist!
** CAST ON ALL STITCHES ONTO 1 NEEDLE then divide them up on your 2nd row**
There are lots of options with this pattern but I'm going to just use Option 2 &3. I like the k3,p1 rib it will make! May help it stay on a chubby little leg?!

Rnd 1:  *k3, p1; rep from* around.
Repeat Rnd 1 in desired option color sequence until leg measures 2,(2,2.5,3,3.5,5.5)inches or desired length.     ~I'm using self striping yarn so I'm not worrying about color sequence! NOTE this will make a ribbed leg all the way to where I want to divide for heel.
Don't like that? Try this...
Rnd 1:  *k2,p2, rep from*around. Rep Rnd 1 until CUFF measures 3/4, (3/4,1,1,1.5,1.5)inches or desired length. NOTE makes a definitive cuff and leg portion*
Work in St st until (stockinette stitch - when knitting in round it's knit every round) leg measures 2,(2,2.5,3,3.5,5.5)inches or desired length.

That should get us going until tomorrow!! Stay tuned for More March Madness on Monday - woot! That's 4 M's all in a row!!  KNIT ON!!!

Favorite Product of the Week...

I'm not sure that this little thing is actually going to be THE favorite product of my week.... it is only Sunday after all and the week is just beginning...
but right now this is IT!!

What is it??
It's a dpn holder! A very simple two cap thingy that's attached to with a bit of elastic! Wow.  The caps go on the dpn's at each end of the knitting and the elastic stretches to the other side! This way when I throw my knitting into my bag, the dpn's won't wiggle themselves out of my knitting! Whoop!! 

See the little black caps at each end of my knitting?  A stretchy bit of elastic keeps the caps in place!

Dang I seriously wish I would have thought of this before.  I normally just wrap my yarn around each of my dpn's and hope like heck it would all stay together - which it usually didn't.  I can't believe I bought this way back before Christmas (yeah.. a little hard to believe that I (me) would buy a knitting gadget at any time I know...) and didn't even use it!!

Now I don't think I have to worry!! 
 2 little end caps and one little piece of elastic, that's all there is to it!
This one fits 7 inch needles sizes 0-3. I just happen to have it on size 3's. It's called the... insert drum roll here because it's pretty original and not very descriptive...
STRETCHY Needle Keeper..
LOL
(This one was $4.99 less military discount at Yarn Cloud)
Yep.. endorsing products now I know... sorry! BUT it's super fabulous and you gotta get one!
 Or get two!!  I have the one for the next sizes up as well!! 2 little red caps on that baby!
I'm sure I could craft one of these up using my very crafty brain... but gadgets are so cool aren't they??

Friday, March 9, 2012

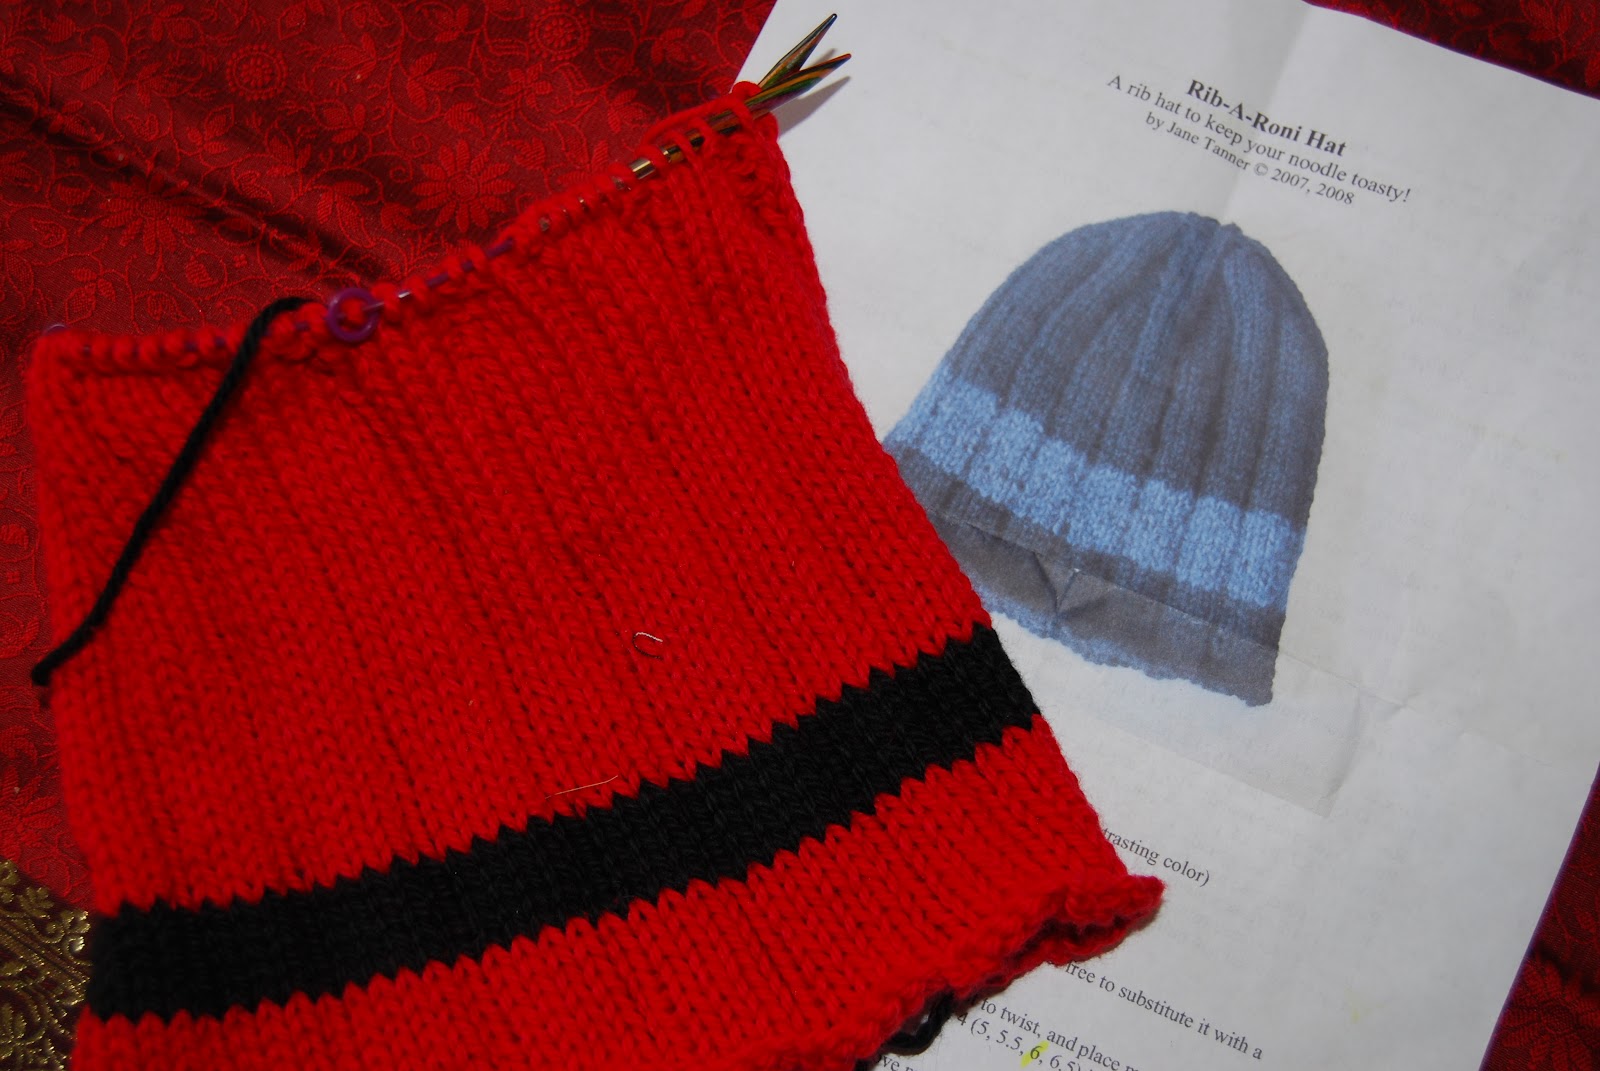
Rib-A-Roni Hat

I have been on a hat thing lately! Making baby hats (10 last month) and just this week I finished a hat for Boy Wonder. *I posted this hat earlier today when I was switching to dpn's from the circular*
I like how the ribbing meets together at the top. It's a super simple pattern which knits up really fast! The ribbing is a little awkward at first - only because I've been knitting up baby hats with a 2x2 rib!! This one is k4, p1, k2 (3,4,5,6), p1 around.... which if you aren't paying attention.... now who would do that? Hm mm? Anyway... you can see where it may lead you astray!


I used the knitted cast on and although I'm not exactly ecstatic about that little bit of a rolled edge... the Kid loves it!  I am pretty happy with how this hat turned out overall! For the decreases the pattern says to use a p2tog-tbl which means to purl two together through the back loop.... say what? Every time I did it that way I ended up with an extra loop like a yarn over so I'm pretty sure I did it wrong! I ended up just purling 2 together the regular way and I think it looks great!

He even managed to smile in his new hat although he was very distracted by the television!
HERE is the link to the pattern. 
*apology here... DB this is NOT the same hat you are working on! I have 2 going on at the same time & I am doing the same as you... it's just not this one! *

Wrestling with half an Octopus

My friend Annie (who I miss dearly) taught me how to use dpn's (double pointed needles) way back when we were all in Monterey. She told me that it was a bit like wrestling with an octopus but once you get the hang of it, it's pretty easy! Especially for a crocheter like Annie!!
She was right! It is easy! AND it is a bit like wrestling with an octopus. Good thing we only have to mess around with 4 octopus legs rather than 8! Yikes!
IF you want to make hats, socks and really small stuff (baby hats!) you really need to know how to use dpn's. Sorry... but that's the way it is!
There are all kinds of tutorials online (www.knittinghelp.com is my fav!) and you can even check out a book at the library. You can also just bite the bullet and buy a book - which I did!! I have Teach Yourself Visually Knitting (click on that highlighted text to go to the page at Amazon). I really like it and if I get stuck on stuff I usually go to that book first!
I'm getting ready to start wrestling with my own half of an octopus right now! I've been making a hat for Boyo - it's the same one that a friend of mine is making right now (DB!) It's a really easy hat, a simple rib that ends up looking pretty cool at the top. HERE  is the link to the blog where we found the pattern! Probably over on Ravelry too!
I started out using a 16 inch #7 circular needle! I love circulars but they only work for so long. Once you start decreasing, that cable gets in the way! It doesn't want to bend enough to allow small numbers of stitches on it. ~I did buy a really super short cable needle... my #8 9inch! But wrong size for this hat. Darnitall!!
Here is my (Boy's hat!) hat still on the circulars


Now I have to get all those stitches off of that circular (which holds them so nicely, I don't usually drop any... sigh) onto those 4 sticks... oh yay...

It's easy!! It is! It's actually a lot easier to put the stitches onto dpn's from a circular than it is to cast on all those stitches...just start knitting with a dpn rather than the circular end on the right!


Just follow your pattern using a dpn as your right needle and knit them all off the cable....

Pretty soon you have a bunch of stitches on your dpn and some left on your cable.... space them out! Put some on another dpn!! You should space it all out so you have a relatively even amount on 3 dpns!! Save that 4th one for knitting!! ****follow your pattern! Try not to start a new dpn with a purl stitch** trust me!!! AND the 2nd stitch on the dpn- pull it tight!! GRRRRR really tight! It will help prevent ladders. Which are ugly....

 Now that you have all of your stitches relatively evened out onto 3 dpns... don't count mine! I'm pretty sure I'm close, but definitely not even!!
Now using your 4th dpn.... knit away!!
Follow your pattern
Try really hard to not start a new dpn with a purl stitch!
When moving to the next dpn.... pull your 2nd stitch really really tight!
Around and around you go!!
It's a bit awkward but once you get going, it's pretty cool!! You can have small amounts of stitches on those needles and don't have to worry about your cable getting in your way!!


Thursday, March 8, 2012

Spreadin' the Love...

My kid has always laughed at me whenever I get out the needles and string. He says it's dumb.
He also complains when he thinks I'm doing nothing but knitting. "How come I can't watch what I want on TV? You're only knitting. You're not watching it..." Um... pretty hard not to just answer with the standard parent answer.."I'm the adult. I can do what I want." The kid questions everything.
E V E R Y T H I N G.
So why was I surprised when he started asking about knitting needles and yarn?  He's been around them practically his entire life but why now? 
"Why does the needle go into the yarn like that? Why do you like yarn so much? Why do you knit all the time? Why? Why? Why? "
In order to de-stress (hahahahaha) I stopped at a local knitting shop a couple of weeks ago... just to look of course! AND of course I had the kid along. Sigh.
Boy Wonder plunked himself down on the sofa positioned right in a ray of sunshine and lounged. Loved it. Loved the sofa too, but he loved how the yarn sparkled in the sunshine. I could tell.  He kept asking me .......... why? Why does this yarn look so nice up next to this one? Why is this stuff thinner than that one? Why is there so much yarn in here? What's this for? What's that for.... on and on and on..... until......... nope! Nobody got annoyed or even irritated.
 Mr. M - the dude working in the shop that day, started talking back to Boy just like he was any other customer.   Pretty soon I noticed (of course I was taking my time... someone else was entertaining my kid!) that my kid was trying to convince Dude that I (yep Me!) can work  the shop so he (Dude) can teach Boy to knit.  "It's okay. My Mom can work the store while you teach me. Yep. She can." LOL
Well... I couldn't of course (could you imagine? I would still end up owing them money!) We left without scheduling because I totally thought the sudden interest in 'stupid ol' knitting' was just for that day. Um... yeah....
A couple of weeks later and the kid is still asking me about knitting. "When you gonna teach me Mom?" "Is today the day I get my knitting lesson?" Yeah...
Let me explain something here... he's a normal child. Doesn't listen to me except when he wants to. Doesn't clean his room. Doesn't do whatever I ask him to do without a hassle. Knitting lessons? From me? Yeah right. Keep on dreaming kid. No way I'm paying money to teach you something I know how to do and could teach you if I wanted to and it would be a total stretch of my patience to try and teach you myself....maybe when you're older.
Another week goes by.....
Mom.... Mom.... can I learn how to knit today? Please?
Note here: his room was clean. Homework was done - all WITHOUT a hassle. Wow. Really?
I gave him some yarn and some needles and tried.  I really tried. His little hands wouldn't do what I wanted them to do and rather than yelling and stressing both of us out............ I CALLED MR. M!!
I splurged. I spent my yarn money... boy was that hard!!! 
BUT... when he sat in the shop with Mr. M for over an hour, knitting away and smiling it was sooooooo worth it!!
Mr. M taught him a different cast on than what I use (long-tail) so at the very end I asked to be shown so I could help out the kid if he got stuck. Guess who taught me how to do it? Not Mr. M!! Boyo muscled his way right over and showed me (very patiently I must add) just how to do it!!
He's been knitting for a few minutes every day now! He knits before school instead of cartoons! Yay!! It's so nice to see him sitting and doing something with his hands that doesn't involve a whole lot of noise and wiggling! I'm not pushing him (that's hard too!) and I'm just letting him choose when he wants to do it! Maybe he'll keep this up?!!