I've recently joined a free pattern testing group over on Ravelry. It's cool, but it's making me stretch myself out of my happy little, comfortable (all right... boring) place. It's made me try new things AND finish them! How funny is that? Me getting excited about finishing stuff AND being held accountable to a time limit? Stop laughing.
That's been one of the biggest challenges I've had while knitting... finishing. Oh! Gimme a break! I finish stuff, just um... sometime way (waaaay) later than when I start. Christmas presents need to be started in July; that sort of thing! Knitting is enjoyable and I'm kind of good at it, but time limits... well... yeah...
BUT now that I've joined this free testing group, I have to be accountable. I must complete the tests I sign up for within set time limits. Must. So far it's been easy. I've completed the few I've done way ahead of time and now I'm ready to begin another one. I've signed up to make a scarf. Say What?
A scarf? Yep. A scarf.
Ha ha.... it's a lacy, lovely, huge thing and it has to be done by 10 March. AND guess what?! I haven't started yet. Go figure.
Hey! I was waiting for my yarn (it arrived yesterday) and when I printed out the pattern... oh no!! Wait! Whoa! It's a chart. C H A R T . Wow. No k2,p2,k47 kinda thing ~ which is what I'm used to. Nope. This one is all little squares with weird symbols. WTH?
Okay... checking another "trying something new" square on my resolutions box... how in the heck do you read a chart?!
I had to spend some time online to figure this one out and guess what?! It's pretty intuitive. You read it just like a regular ol' knitting pattern except it's more of an 'I don't know how to read actual words' sort of thing. Like a picture menu at a restaurant. Point to the picture of what you want dearies! Each little picture, in each little square means some sort of stitch. *more sighing loudly* I guess I'm going to go slowly until I get all those little symbols memorized... hoping for sometime before row 442.... omygosh I certainly hope I can meet the time limit!
Showing posts with label knitting. Show all posts
Showing posts with label knitting. Show all posts
Friday, February 22, 2013

Thursday, August 9, 2012
When a Crocheter Knits
My crochet friends are wonderful friends, don't get me wrong, but........ Do not believe your crochet friends... ever!! Never!! They tell fibs. Big ones. ALL the time. Oops. Wait... let me rephrase that a little bit! I have two friends that strictly *cough* crochet. They said they can't knit. *insert a little whine here...* "I don't know how. It looks hard. Two sticks? Really? I can't do that!" ~ those are just a few of the whines things that I have heard them say.
Um... yeah... so don't believe when theylie to your face say they can't knit. They probably can.
 V's KNITTED washcloths.
 My friend Miss V way out West in Tennessee said she can't knit. Doesn't know how. Whatever. *insert eye rolling*. She knits. She knits like crazy! She made & sold knitted washcloths at a craft fair last year AND she knits these crazy scarves by the bazillion! Her grandmother-in-law sells them to her friends as fast as V can make them! Not only is she knitting away... she's making some money at it! Can't knit huh? Oh yeah... to add to her list of already growing transgressions... just yesterday she asked me to clarify a pattern direction for her. NOT a crochet pattern mind you..... A KNITTING PATTERN! Yes, V.. k1, p4 for two rows means you k1, p4 all the way across a row and then return, therefore doing it x2 rows. AND THEN.... she says she has to by circulars. Oh really?
My other crochet friend... who by the way is the crochet expert in our local knitting group * did you catch that? K N I T T I N G group! Anyway... (yes you can insert eye rolling here) Miss M is not only an expert crocheter, she lies. Lies like a rug. She knits. I even caught her with dpn's. Oh my.
The other night, Miss T and her children were here for a visit. She decided that she was going to 'mess around' with knitting needles. *insert snorts & eye rolling* Mess around? Lies. Completely. Mess around meant that she was bored with not only knitting, but purling as well. AND guess what? Even more lies! She made ribbing! Mmmhmmm... ribbing.
So... me being the superwonderfulnicehelpfulfriend (yes, all one word) I decided instead of her distracting me with her cute kid so she could knit in relative peace; I would show her cables. That stuff is hard! Right?! NOT. Miss Thang herself gets it lickety split! Yeah... Miss I don't know how to knit............
 This is what she did. Besides lying to me....
Um... yeah... so don't believe when they
 V's KNITTED washcloths.
 My friend Miss V way out West in Tennessee said she can't knit. Doesn't know how. Whatever. *insert eye rolling*. She knits. She knits like crazy! She made & sold knitted washcloths at a craft fair last year AND she knits these crazy scarves by the bazillion! Her grandmother-in-law sells them to her friends as fast as V can make them! Not only is she knitting away... she's making some money at it! Can't knit huh? Oh yeah... to add to her list of already growing transgressions... just yesterday she asked me to clarify a pattern direction for her. NOT a crochet pattern mind you..... A KNITTING PATTERN! Yes, V.. k1, p4 for two rows means you k1, p4 all the way across a row and then return, therefore doing it x2 rows. AND THEN.... she says she has to by circulars. Oh really?
 My other crochet friend... who by the way is the crochet expert in our local knitting group * did you catch that? K N I T T I N G group! Anyway... (yes you can insert eye rolling here) Miss M is not only an expert crocheter, she lies. Lies like a rug. She knits. I even caught her with dpn's. Oh my.
The other night, Miss T and her children were here for a visit. She decided that she was going to 'mess around' with knitting needles. *insert snorts & eye rolling* Mess around? Lies. Completely. Mess around meant that she was bored with not only knitting, but purling as well. AND guess what? Even more lies! She made ribbing! Mmmhmmm... ribbing.
So... me being the superwonderfulnicehelpfulfriend (yes, all one word) I decided instead of her distracting me with her cute kid so she could knit in relative peace; I would show her cables. That stuff is hard! Right?! NOT. Miss Thang herself gets it lickety split! Yeah... Miss I don't know how to knit............
 This is what she did. Besides lying to me....
See that? Knitting a border on both ends! Some stockinette stitch, some ribbing and those cables! *the odd shape of the sampler is my fault... I didn't have her count on an adequate amount of stitches... sigh
So my friends - whom I know will not lie about their talents..... do not believe your crochet friends when they say the cannot lie knit.
Monday, July 30, 2012
Do Over Week 3
Portable Projects with a Cause is definitely A GO!!! Thanks to all my wonderful new friends and their knitting & crochet talents, I think we may end up with (definitely 2) three complete afghans at the end!
 This is just a sample of the blocks we have completed! Block 1 - Big Bamboo, Block 2 - Horseshoe Cable and now ... insert drum roll please...
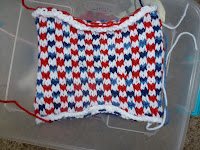
Don't worry, it's really simple! It only looks hard! It's just a matter of (gasp!) working with three yarns.... ha ha! Really you only work with one at a time! Not some fancy schmancy color work but it certainly looks like it could be! In this block you just slip some stitches to make it look a lot harder than it actually is!
So... starting out with 3 yarns (all different of course!) *definitely try and use something that coordinates (or is the same) as blocks one and two! Pick a main color... in the block above, white was the main (color A) color. Red = B & Blue = C.
Cast on 42 Sts.
Row 1 (wrong side): with A, purl
Row 2 : With B, k1, sl 1 wyib, *k2, sl2 wyib; repeat from * to last 4 sts, k2, sl 1 wyib, k1.
*** WYIB means 'with yarn in back'... no worries... just hold your yarn like you would normally knit with it... in the back!! Some patterns have you bringing it to the front (as if to purl) to make a wrap and/or to slip the stitches, this one just wants us to keep it in the back when we are knitting a row. Guess what we do with it when we are purling?!! Yep! You guessed it!! With yarn in front!! WYIF!!
Row 3: With B, p1, sl 1 wyif, p2, *sl 2 wyif, p2; repeat from * to last 2 sts, sl 1 wyif, p1
Row 4: With A, knit entire row
Row 5: With C, *p2, sl 2 wyif; repeat from * to last 2 sts, p2.
Row 6: With C, k2, *sl2 2 wyib, k2; repeat from * across
Repeat Rows 1-6 until piece measures 10'/25.5cm from beginning. Bind off.
The biggest trick to this is remembering to slip those stitches!! And of course to make sure that when you are slipping those stitches that you don't pull your yarn too tight! If you do, it will just smoosh it up and make it tighter! Don't worry though because once we block it, it should stretch out a bit and better yet... when we attach it to the other blocks; we'll never notice!
Again.... for the crochet version. I will ask my resident crochet expert, Ms. T for a little direction and maybe a guest post!
****
WYIF - with yarn in front. Just means to bring the yarn to the front - almost like you were going to purl with it.
WYIB - with yarn in back. Just hold your yarn in back; just like you do in knitting.
sl - slip
sts- stitches
* bla, bla; repeat from * across.... repeat the pattern directions inside the *'s
 This is just a sample of the blocks we have completed! Block 1 - Big Bamboo, Block 2 - Horseshoe Cable and now ... insert drum roll please...
Block 3 - Peas & Carrots!!
So... starting out with 3 yarns (all different of course!) *definitely try and use something that coordinates (or is the same) as blocks one and two! Pick a main color... in the block above, white was the main (color A) color. Red = B & Blue = C.
Row 1 (wrong side): with A, purl
Row 2 : With B, k1, sl 1 wyib, *k2, sl2 wyib; repeat from * to last 4 sts, k2, sl 1 wyib, k1.
*** WYIB means 'with yarn in back'... no worries... just hold your yarn like you would normally knit with it... in the back!! Some patterns have you bringing it to the front (as if to purl) to make a wrap and/or to slip the stitches, this one just wants us to keep it in the back when we are knitting a row. Guess what we do with it when we are purling?!! Yep! You guessed it!! With yarn in front!! WYIF!!
Row 3: With B, p1, sl 1 wyif, p2, *sl 2 wyif, p2; repeat from * to last 2 sts, sl 1 wyif, p1
Row 4: With A, knit entire row
Row 5: With C, *p2, sl 2 wyif; repeat from * to last 2 sts, p2.
Row 6: With C, k2, *sl2 2 wyib, k2; repeat from * across
Repeat Rows 1-6 until piece measures 10'/25.5cm from beginning. Bind off.
The biggest trick to this is remembering to slip those stitches!! And of course to make sure that when you are slipping those stitches that you don't pull your yarn too tight! If you do, it will just smoosh it up and make it tighter! Don't worry though because once we block it, it should stretch out a bit and better yet... when we attach it to the other blocks; we'll never notice!
Again.... for the crochet version. I will ask my resident crochet expert, Ms. T for a little direction and maybe a guest post!
****
WYIF - with yarn in front. Just means to bring the yarn to the front - almost like you were going to purl with it.
WYIB - with yarn in back. Just hold your yarn in back; just like you do in knitting.
sl - slip
sts- stitches
* bla, bla; repeat from * across.... repeat the pattern directions inside the *'s
Saturday, April 21, 2012
How does your Hubby spell Knitting?
My husband thinks that knitting is spelled like this... K n i t t i n g S t o r e. Or maybe he thinks it is spelled like this... m o n e y. Poor guy really does know how to spell but every time I start a new project it usually involves running off to some knitting store.
Today was no exception! I've been working on the sweater vest for Wild Thing the last few days and am so ready to start the finishing, but.... darnitall! My stitch marker box has been AWOL (absent without leave) for about a week. I can't use regular old yarn stitch markers, I have to have the locking kind! That meant it was off to the knitting store for Big & Schi-Schu today!! Go me!!
I really didn't want to spend our 'date' day at the yarn store and honestly, I didn't think I could talk him in to it either, so I casually suggested that we stop at Joann's as we were driving by. It wasn't out of the way or anything! Joke really was on Big though because I 'let' him talk me into stopping at Ikea! Which is really funny but that's what he chose to do! I did try to play nice and do one of those "it's okay Honey. Really. You don't have to go in with me, I will just zip in, pick up what I need and be back out in like 5 minutes." I don't think he believed me because he went in with me! Probably just to make sure that none of the yarn grabbed me and made me stay more than those promised five minutes! It was one of the fastest trips in and out of Joann's in my recorded history, but.... I did manage to grab a skein of yarn (shh) as well as my stitch markers! Gee... you gonna give me a hard time about one measly skein of yarn too? It's not even for me! It's for my friend G! She wants to make a ruffly scarf and I've never seen this particular kind of yarn for less than $10 so of course I had to grab her some!
Anyway... back on track.....
Why do you need more locking stitch markers asks my hubby? To finish this vest for Wild Thing of course! I thought you were almost done with that and besides his birthday isn't until October... yeah. I shut him down pretty fast on that one..... well... we did go to Ikea after all! LOL He doesn't really mind going to the knitting store, he just likes to give me a hard time!
In case you are wondering why I needed more stitch markers.....
I've decided to once again try something new! A little pre-planning for picking up stitches along the arm edges and the neck facing! Just to make sure that it all comes out even (AND I don't have to do it 12 times!)
I'm supposed to pick up 72 stitches along each arm edge, starting at the middle of the bottom. Thinking that this should all be sort of even (it may look better!) I'm taking the stitch markers and placing them at regular(ish) intervals all along where I'm supposed to pick up those 72 stitches.
 See? Evenly spaced out (sorta)! I'm hoping that this way I can evenly space the stitches out and not have big gaps. I hate gaps. I always rip them out and start over and I've been known to do it multiple times! The plan this time is to just avoid it! So keep your fingers crossed and stay tuned! I will let you know how my plan goes!~
Today was no exception! I've been working on the sweater vest for Wild Thing the last few days and am so ready to start the finishing, but.... darnitall! My stitch marker box has been AWOL (absent without leave) for about a week. I can't use regular old yarn stitch markers, I have to have the locking kind! That meant it was off to the knitting store for Big & Schi-Schu today!! Go me!!
I really didn't want to spend our 'date' day at the yarn store and honestly, I didn't think I could talk him in to it either, so I casually suggested that we stop at Joann's as we were driving by. It wasn't out of the way or anything! Joke really was on Big though because I 'let' him talk me into stopping at Ikea! Which is really funny but that's what he chose to do! I did try to play nice and do one of those "it's okay Honey. Really. You don't have to go in with me, I will just zip in, pick up what I need and be back out in like 5 minutes." I don't think he believed me because he went in with me! Probably just to make sure that none of the yarn grabbed me and made me stay more than those promised five minutes! It was one of the fastest trips in and out of Joann's in my recorded history, but.... I did manage to grab a skein of yarn (shh) as well as my stitch markers! Gee... you gonna give me a hard time about one measly skein of yarn too? It's not even for me! It's for my friend G! She wants to make a ruffly scarf and I've never seen this particular kind of yarn for less than $10 so of course I had to grab her some!
Anyway... back on track.....
Why do you need more locking stitch markers asks my hubby? To finish this vest for Wild Thing of course! I thought you were almost done with that and besides his birthday isn't until October... yeah. I shut him down pretty fast on that one..... well... we did go to Ikea after all! LOL He doesn't really mind going to the knitting store, he just likes to give me a hard time!
In case you are wondering why I needed more stitch markers.....
I've decided to once again try something new! A little pre-planning for picking up stitches along the arm edges and the neck facing! Just to make sure that it all comes out even (AND I don't have to do it 12 times!)
I'm supposed to pick up 72 stitches along each arm edge, starting at the middle of the bottom. Thinking that this should all be sort of even (it may look better!) I'm taking the stitch markers and placing them at regular(ish) intervals all along where I'm supposed to pick up those 72 stitches.

Saturday, January 21, 2012
What a Busy Week!
Wow. I really didn't think that I would continue to be busy during the winter months. Especially didn't believe that I would get more busy. What is it with January anyway? I want to just stay home & snuggle up with a mug of tea, a book and maybe (just maybe) some knitting. Think that's happened lately? Um... no. Not at all. I don't think I've even been home for more than 2 hours at a time- except for the time between Boy coming home from school and bedtime of course and that totally doesn't count!
Between appointments, volunteering at school and the USO I have no idea where my day goes, but it certainly does not go over (or anywhere near) my yarn stash! Not to mention that I haven't even blogged this week. For me... that's busy!
Lucky for me the weather this morning is not so nice! How lucky is that huh? I went for a walk this morning and didn't even have to work to make my heart rate increase! Every time I slipped and felt my feet try to slide out from underneath me... I'm sure my heart rate went way up!! Now that I have that out of the way for the day, I'm staying in!! Working on a few (too many) projects around here. NONE of which include that dreaded word.... housework!! That can wait! I am calling an Ice Day!!
I think I will stay in... the coffeepot is on, the coffee is ground and I have a billion tea bags for when that's empty! Woohoo!
So for now I'm finishing this......
 It's a cabled (yes! I said cabled) soap cover. It needs to be sewn over a bar of soap, felted and then thrown into the shower! It will help make the bar of soap last longer and I can use all those itty, bitty pieces of soap that tend to get left in a pile...
 I think I might even have time to finish this lacy knit cowl for me! Finally something for me! I bought some mill ends (the stuff that's left over after a skein of yarn has been made at the mill) from my favorite fiber mill when I was home in Michigan and have finally now gotten to the point where I'm almost finished~!
 I also need to finish this! A baby hat for "Mo". His baby shower is in two weeks and I had some yarn left over after his blanket so.. now I'm making a cabled (yep! dreaded cable word again!) hat!
 AND tp tubes! Oh yay!! I have a project in mind for these babies... but without a lot of behinds using up the tp at our house I had to beg the neighbors for theirs. Which is pretty funny if you think about it!
Between appointments, volunteering at school and the USO I have no idea where my day goes, but it certainly does not go over (or anywhere near) my yarn stash! Not to mention that I haven't even blogged this week. For me... that's busy!
Lucky for me the weather this morning is not so nice! How lucky is that huh? I went for a walk this morning and didn't even have to work to make my heart rate increase! Every time I slipped and felt my feet try to slide out from underneath me... I'm sure my heart rate went way up!! Now that I have that out of the way for the day, I'm staying in!! Working on a few (too many) projects around here. NONE of which include that dreaded word.... housework!! That can wait! I am calling an Ice Day!!
I think I will stay in... the coffeepot is on, the coffee is ground and I have a billion tea bags for when that's empty! Woohoo!
So for now I'm finishing this......
 It's a cabled (yes! I said cabled) soap cover. It needs to be sewn over a bar of soap, felted and then thrown into the shower! It will help make the bar of soap last longer and I can use all those itty, bitty pieces of soap that tend to get left in a pile...
 I think I might even have time to finish this lacy knit cowl for me! Finally something for me! I bought some mill ends (the stuff that's left over after a skein of yarn has been made at the mill) from my favorite fiber mill when I was home in Michigan and have finally now gotten to the point where I'm almost finished~!
Stonehedge Fiber Mill is less than 2 miles from our house in Michigan so I always try to buy my fiber for spinning directly from them. Their yarn is available even here in Virginia! http://www.stonehedgefibermill.com/
 I also need to finish this! A baby hat for "Mo". His baby shower is in two weeks and I had some yarn left over after his blanket so.. now I'm making a cabled (yep! dreaded cable word again!) hat!
  AND tp tubes! Oh yay!! I have a project in mind for these babies... but without a lot of behinds using up the tp at our house I had to beg the neighbors for theirs. Which is pretty funny if you think about it!
LINK to what I'm trying to make!
So it's shaping up to be a great day in! Hope you have fun with yours!
Wednesday, December 21, 2011
Merrily I knit Along....
Knit along... knit along... Merrily I knit along.... all the way to Christmas! ~ Please sing that last line to the tune Row, Row Your Boat.......
I know I said that yesterday was my last post for the year, but I started the Gap-tastic Cowl Pattern yesterday morning and I'm zipping right along! I just had to show you the progress!
It's such a change to work on size 13 needles and with bulky yarn that I'm just amazed at how fast it's going! Hint... if you want a quick project to make for yourself or your... try this! I have a friend that may be getting something like this for her birthday next year...........
I couldn't find the yarn recommended in the pattern. I made a quick trip over to M's (you know... the craft store...) rather than going all the way over to my favorite yarn shop! The store did have Lion Brand Wool-Ease but not in Chunky. They only had Thick & Quick. The Thick & Quick is really nice stuff; nice & smooth and would knit up super duper fast... but... it was $7.99. Gasp. I needed 3 skeins & for a GIL (girlfriend in law) that's a lot. Considering the amount of effort I just made driving to the store to get blue yarn (her favorite color) and by spending the next couple of days knitting her a present....... OMG did I just sound like Scrooge? Yikes........

 I think I may be okay here because her favorite color is blue & this yarn I bought is a nice blue. Yes.. I am a yarn snob.......
Oh, I know... I'm sounding a bit (a lot?) Scroogey, but........ I'm just hoping I get this done & wrapped before Christmas morning... I think she'll love it!
I learned from my last few things I've made in the round.....
*When I cast on, I use markers every 20 stitches I cast on for reference points! Makes counting easier for one thing! I leave them on after I make sure I have the right amount when I'm ready to knit! I then just follow the pattern (in this case it's Seed Stitch) and if I mess up along the way, I just have to go back to the last marker. As I knit around, each marker is my check point. IF I get to the next marker and my pattern isn't right, I only have to mess around with 20 stitches to make sure I'm in the right pattern! I especially learned my lesson doing the Jacques Cousteau Hat ~ crazy K3, P2 pattern anyway!
So that's it... I'm officially done for the year! I will post pictures of this when I get home from Michigan and having a wonderful Christmas with my family!

I know I said that yesterday was my last post for the year, but I started the Gap-tastic Cowl Pattern yesterday morning and I'm zipping right along! I just had to show you the progress!
It's such a change to work on size 13 needles and with bulky yarn that I'm just amazed at how fast it's going! Hint... if you want a quick project to make for yourself or your... try this! I have a friend that may be getting something like this for her birthday next year...........
I couldn't find the yarn recommended in the pattern. I made a quick trip over to M's (you know... the craft store...) rather than going all the way over to my favorite yarn shop! The store did have Lion Brand Wool-Ease but not in Chunky. They only had Thick & Quick. The Thick & Quick is really nice stuff; nice & smooth and would knit up super duper fast... but... it was $7.99. Gasp. I needed 3 skeins & for a GIL (girlfriend in law) that's a lot. Considering the amount of effort I just made driving to the store to get blue yarn (her favorite color) and by spending the next couple of days knitting her a present....... OMG did I just sound like Scrooge? Yikes........

 I think I may be okay here because her favorite color is blue & this yarn I bought is a nice blue. Yes.. I am a yarn snob.......
It's soft and has some texture..... what's not to love? AND it was on sale for $2.99 each. Yay!
It even has a lovely name.. Ocean Tide..... just saying that makes me feel better about it. Until I pick up my needles and then I'm not so happy. It catches on my tips. A lot. I've split stitches and it's a bit frustrating to work with. BUT I like how it's looking. I really do. Oh, I know... I'm sounding a bit (a lot?) Scroogey, but........ I'm just hoping I get this done & wrapped before Christmas morning... I think she'll love it!
I learned from my last few things I've made in the round.....
*When I cast on, I use markers every 20 stitches I cast on for reference points! Makes counting easier for one thing! I leave them on after I make sure I have the right amount when I'm ready to knit! I then just follow the pattern (in this case it's Seed Stitch) and if I mess up along the way, I just have to go back to the last marker. As I knit around, each marker is my check point. IF I get to the next marker and my pattern isn't right, I only have to mess around with 20 stitches to make sure I'm in the right pattern! I especially learned my lesson doing the Jacques Cousteau Hat ~ crazy K3, P2 pattern anyway!
So that's it... I'm officially done for the year! I will post pictures of this when I get home from Michigan and having a wonderful Christmas with my family!
Happy Holidays to you!
Friday, December 2, 2011
I'm on a Roll......
Now that I've finally gotten over my inability to start something new........ I'm totally heading in the opposite direction. Which may or may not be a good thing.
Definitely interesting.... that's for sure!
I've decided to knit a neck warmer for my Dad, aka Parental Unit #1. He likes to walk outside every day and in Detroit the weather gets a bit nippy! We are trying to go super simple this year for Christmas and make things rather than buying stuff. Hopefully it will mean more and with my Dad... yeah... it will!
Besides.... this pattern is really simple and doesn't take a whole lot of time to knit up. Unless...... you change something and then you may end up kicking yourself......
Using #8, 16 inch circular needle (Addi Turbo OF COURSE!) cast on 116 stitches with worsted weight yarn. I'm using Cascade 220 in black. ~I have no idea what his favorite color is so black it is!
It's either me (my eyes) or just because the yarn is black, but I find myself needing more light to see what I'm doing. Grrrrr. I totally thought that aging thing would pass me by..........
Anyway.... cast on #116 stitches (or in my case I forgot to count and ended up with 120) and knit 2, purl 2, all the way around and around and around and around! You need about 9 inches total for a nice neck warmer ~which ends up to be almost the entire skein of yarn. (220 yds)
It's a totally mindless, endless pattern, but I can take it anywhere with me and work on it! I've worked on it while waiting in the pharmacy, while waiting in the car and actually while standing in line waiting to pick up the kid! *I can't walk & chew gum but I can knit and stand!*
As I was saying.... it's mindless......... it's kind of boring.......
so... why not pump it up a notch? Um........ yeah........
I've added a pattern. An Intarsia, color work thing that is driving me absolutely ape!
I don't like how my ends look inside, I feel like it's not working right, I want it to be over! Mostly so I can look at it and say....... "Hey! That's not so bad!" Ha... bet that won't happen!
 So I started with this. A big ol' print out of something PU #1 (Parental Unit #1) enjoys.......
 Transferred it to graph paper. Totally ignoring that it may be (maybe?) too big....
 Figured out where the middle of my neck warmer was going to be and started knitting. Following the graph/chart I add an orange stitch where the graph says too......keeping in the k2, p2 pattern. This is what I've got so far. Plus a whole lot of aggravation.
I admit it. I'm a pattern follower and a direction follower. I don't often go off the path.......but I did okay!? I did.
I'm not sure it's really going to look like the initial design ~but that's OK, it's a copyrighted design and I could probably get into trouble if it was exactly like the original. Good reasoning huh? Ha.
I am just over halfway done with adding the design. I have 3 more rows before I start decreasing to make the top part of it. Grrrrrrr.
Now I'm wondering just whose idea it was to add color work to MY knitting anyway...........
Definitely interesting.... that's for sure!
I've decided to knit a neck warmer for my Dad, aka Parental Unit #1. He likes to walk outside every day and in Detroit the weather gets a bit nippy! We are trying to go super simple this year for Christmas and make things rather than buying stuff. Hopefully it will mean more and with my Dad... yeah... it will!
Besides.... this pattern is really simple and doesn't take a whole lot of time to knit up. Unless...... you change something and then you may end up kicking yourself......
Using #8, 16 inch circular needle (Addi Turbo OF COURSE!) cast on 116 stitches with worsted weight yarn. I'm using Cascade 220 in black. ~I have no idea what his favorite color is so black it is!
It's either me (my eyes) or just because the yarn is black, but I find myself needing more light to see what I'm doing. Grrrrr. I totally thought that aging thing would pass me by..........
Anyway.... cast on #116 stitches (or in my case I forgot to count and ended up with 120) and knit 2, purl 2, all the way around and around and around and around! You need about 9 inches total for a nice neck warmer ~which ends up to be almost the entire skein of yarn. (220 yds)
It's a totally mindless, endless pattern, but I can take it anywhere with me and work on it! I've worked on it while waiting in the pharmacy, while waiting in the car and actually while standing in line waiting to pick up the kid! *I can't walk & chew gum but I can knit and stand!*
As I was saying.... it's mindless......... it's kind of boring.......
so... why not pump it up a notch? Um........ yeah........
I've added a pattern. An Intarsia, color work thing that is driving me absolutely ape!
I don't like how my ends look inside, I feel like it's not working right, I want it to be over! Mostly so I can look at it and say....... "Hey! That's not so bad!" Ha... bet that won't happen!
 So I started with this. A big ol' print out of something PU #1 (Parental Unit #1) enjoys.......
 Transferred it to graph paper. Totally ignoring that it may be (maybe?) too big....
I admit it. I'm a pattern follower and a direction follower. I don't often go off the path.......but I did okay!? I did.
I'm not sure it's really going to look like the initial design ~but that's OK, it's a copyrighted design and I could probably get into trouble if it was exactly like the original. Good reasoning huh? Ha.
I am just over halfway done with adding the design. I have 3 more rows before I start decreasing to make the top part of it. Grrrrrrr.
Now I'm wondering just whose idea it was to add color work to MY knitting anyway...........
Tuesday, November 1, 2011
KAL -Day 2 of the Baby Sweater
What a boring name! IF You can come up with a better one I will definitely give you a prize! You must log in and leave a comment for me to see it and I will pick the winner on Friday, November 4th!!
Day 2 of our KAL - the Baby Sweater (totally submit a new name please!) brings me to the end of my hood and on to the yoke! That part that starts at the bottom of the hood and makes room for the shoulders!
After you are done knitting the hood to it's required length, you need to decrease a certain amount of stitches all the way around - evenly! That just means to not bunch them up all in one spot! Space them out and make sure you do some on each side. I just did a simple decrease by knitting two together (K2tog) and it looks fine!
Next row......... now you have to increase! What?! Why did I decrease!? Geez! Oh well... it makes the hood look really nice! Increases are pretty simple too - especially with the way this pattern is written! After you've placed your markers where you are told too, you knit up to one stitch before the marker and increase, slip the marker and increase again! This way there is an increase on each side of the marker! It will make it look really cool later - you'll see! Oh wait.. you want to see now?
 This is what we are shooting for!! A simple little hooded sweater! No button holes, no zippers and knit in one piece from the top down! I've already made some changes to mine... I'm doing the Provisional Cast on at the beginning of the hood (the center of the hood) so I can Kitchener stitch it together later for an almost invisible seam... and I'm thinking about how I can add button holes to the front. Hmmm.....
 First I have to get to the point where I can make those buttonholes! Right now this is where I am! Finished with the hood and increased to the number of stitches my directions have listed. I'm pretty sure if (IF- ha!) I mess up, I can correct it by just decreasing or increasing to make sure I have the right number of stitches between the markers.
Day 2 of our KAL - the Baby Sweater (totally submit a new name please!) brings me to the end of my hood and on to the yoke! That part that starts at the bottom of the hood and makes room for the shoulders!
After you are done knitting the hood to it's required length, you need to decrease a certain amount of stitches all the way around - evenly! That just means to not bunch them up all in one spot! Space them out and make sure you do some on each side. I just did a simple decrease by knitting two together (K2tog) and it looks fine!
Next row......... now you have to increase! What?! Why did I decrease!? Geez! Oh well... it makes the hood look really nice! Increases are pretty simple too - especially with the way this pattern is written! After you've placed your markers where you are told too, you knit up to one stitch before the marker and increase, slip the marker and increase again! This way there is an increase on each side of the marker! It will make it look really cool later - you'll see! Oh wait.. you want to see now?
See those lines? (blue on top) running from top to bottom, by the markers? That's the rows where I've increased. 


The pic on the bottom (yellow) is the same sweater. I finished a while ago - you can really see the increase lines running from shoulder to underarm! I think it looks pretty cool!
With this pattern, look on first page in the paragraph "abbreviations", the writer has written ............
"inc - knit into front and back of next stitch".
Now, I know this means to increase and if I knit into the front and back of a stitch, it magically becomes two! How simple is that! I was a little worried that both stitches that I've increased (one on each side of marker) would then lean the same way.... but.... the first time I made this sweater I really didn't know that so I just followed directions and I was happy! The next time I made it I tried a different increase, making sure each side of the marker leaned in toward the marker. Well.... that was okay and required a bit more thought, but like I said the results were okay. Just okay. Now I'm just going to follow those increase directions just like they are written! The results were the best if I followed the directions... imagine that?!
Following the directions; knit to within 1 stitch of the marker, k into the front back of the marker (increase made), slip marker, inc~! Easy enough!
Just to make it a little more clear............Each stitch has two "legs" of the yarn hanging on the needle - those little loops that wrap around it! To kfb (knit front and back) you do just that. Knit into the front leg *without taking it off needle* and then knit into the back leg *now slip it off* this makes the one stitch 2! Magic! I tried to upload a video of me showing you how, but..... you don't see it?! Right. You don't. It's not there! Grrrrr
 This is what we are shooting for!! A simple little hooded sweater! No button holes, no zippers and knit in one piece from the top down! I've already made some changes to mine... I'm doing the Provisional Cast on at the beginning of the hood (the center of the hood) so I can Kitchener stitch it together later for an almost invisible seam... and I'm thinking about how I can add button holes to the front. Hmmm.....
 First I have to get to the point where I can make those buttonholes! Right now this is where I am! Finished with the hood and increased to the number of stitches my directions have listed. I'm pretty sure if (IF- ha!) I mess up, I can correct it by just decreasing or increasing to make sure I have the right number of stitches between the markers.
 Next up is dividing for the sleeves! You can see on the picture (from right to left) there are 4 markers...... when you divide for the sleeves you take the first marker off, k1 and then put all the stitches that were between the 1st & 2nd markers onto a stitch holder ~ a piece of scrap yarn works better! It's easier to manipulate! Do that for the other side and now you get to work on the body stitches! You will come back to those sleeve stitches later and work them into the round (as tubes) down to the wrists!
If you have a problem kfb'ing....
try watching this video *ignore her pattern stuff, just pay attention to the kfb part*
It's simple! It really is. Just looks a lot harder than it really is!
Have fun & I'll see you tomorrow!
Monday, October 31, 2011
KAL Day 1
Yay! You've decided to hang out with me to knit a baby sweater!
 Just in case you forgot or you can't find it... here is the pattern........... www.knittingpureandsimple.com
click on resources in the upper right corner and then on free patterns! It's the simple baby cardigan shown in pink!
I've changed my mind what yarn I'm using! I decided to splurge a little (a lot) and go with Cashmerino Baby by Debbie Bliss. I've bought a yummy soft pretty blue ~there isn't a color name. Just a number; 340032. *If you're spending $money$ on yarn try and get the same dye lot for all your skeins! Sometimes they are different dye lots and it does show up. Sometimes not! BUT if you're spending $10 a skein... go for it & get them all the same!
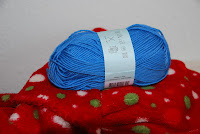 I love how this Baby Cashmerino feels and so far it's knitting up oh so yummily!


click on resources in the upper right corner and then on free patterns! It's the simple baby cardigan shown in pink!
I've changed my mind what yarn I'm using! I decided to splurge a little (a lot) and go with Cashmerino Baby by Debbie Bliss. I've bought a yummy soft pretty blue ~there isn't a color name. Just a number; 340032. *If you're spending $money$ on yarn try and get the same dye lot for all your skeins! Sometimes they are different dye lots and it does show up. Sometimes not! BUT if you're spending $10 a skein... go for it & get them all the same!
 I love how this Baby Cashmerino feels and so far it's knitting up oh so yummily!
 With this pattern you need to use a circular needle and dpn's!! You don't knit in the round with the circular, but at times you will have so many stitches on that you need the cable to hold all those babies! You will use dpn's (double pointed needles) to knit the sleeves in the round! It's easy! If you haven't worked with dpn's.... this will be a good place to start! I'm using my clear, acrylic Knitpicks needles #7 and a 24 inch cable. For my dpn's I have bamboo!
Are you ready to start? Got all your yarn? Your needles, your pattern? Good! Me too!
So....... the pattern says to cast on 60 stitches (I'm making the 6 month size) and I knit fairly tight so I know this size will be a good one for a new baby and get him through the first couple of months! Which may buy me some time to make some more stuff!
It's okay to follow the pattern exactly. In fact... that's probably what we should do, but my friend Christen has encouraged me to try and branch out a little! Try something new!
If YOU want to change things up a bit .... here we go!!
Cast on........
you can do the regular ol' cast on that you usually use - it will work out well....This sweater starts off at the top of the hood - the part that frames the face! Once you get the whole sweater done.... you head back up to that hood and seam the rectangle into a hood! You get a seam right down the center of the top of the head. Which is cool.......... BUT if you don't seam so well....... not that great!
Well...... I cannot. Not well at all! My seams end up looking all wonkity and weird and I just don't like them! This time I'm trying something new!
I'm doing a provisional cast on! *click on that link for a quick definition and tutorial* I'm casting on my stitches using the provisional cast on method so I end up with live stitches when I'm all done! That way no seaming! Just grafting. Seriously! The Kitchener stitch for grafting is really pretty simple!
A provisional cast on is a method of way of casting on your stitches and beginning a knitted project so the cast on is invisible (love that!) and can be knit from either direction. You can use this cast on if you want to add some sort of knitted trim at the end (how about a furry trim for a little girl?) or you want to be able to end up with live stitches that I can be graft (Kitchener stitch) together for an almost invisible seam! Because I don't like how my seams end up when I sew them together... I'm using the provisional cast on method!!
How can you do it too?
Well....... I could show you........ or....... you could watch this here video....... this one right here!
*click on the link to go to a youtube video on how to do the provisional cast on!*
Lucy Neatby shows you exactly how I do it - because I learned it from watching her! I figured it was easier just to plug a video in from someone else! Easier to watch that way too!
Here's what mine looks like! I used a hot pink so it was totally noticeable!


Now I'm off to the races! Or off to knit!! Have fun!!
Just follow the directions like they are written in the pattern and you'll be fine!
IF you get stuck..... just ask!
Stay tuned for tomorrow's episode of the KAL Baby Sweater..........
Subscribe to:
Posts (Atom)